When it comes to comparing neon and LED light sources, sign maker George Zienowicz boldly takes a most-interesting viewpoint: He actually finds that most of his average customers really don’t know—or care about—what lighting component they want used in their signage. “I’ve never had a customer specifically request that their channel letters be lit with LED or neon,” he says. “All they care about is that their sign lights up.”
Meet George Zienowicz—a thirty-year, all-around veteran of the sign industry with one foot in the old school (hand letterer, neon tube bender, gilder, carver, sheet metal fabricator, etc.) and the other in the new school (CNC routers, digital printers, software, etc.).
George owns Zienowicz Sign Company in Chambersburg, New Jersey where, for the past twenty-five years, he has made custom dimensional and illuminated signage for various businesses, organizations, and agencies. Size doesn’t matter: He does jobs for big clients and small mom-and-pop businesses (and those in-between). His signs can be found throughout New Jersey’s capital region of Trenton—even at the governor’s residence and the State House.
Zienowicz Sign Company is a three-person shop. The “independent thinkers” and “problem solvers” who work there dabble in everything—design, fabrication, installation, etc.
Light Sources
To George, both LED and neon components are just sources of illumination. He believes a good design will always be a good design, and he still dabbles in free-form neon from time to time. He’s just found that customers are more interested in having their neon signs repaired, as opposed to ordering new ones.
He will guide customers toward neon if it needs to be used. “Neon works better in an open-face, exposed channel letter or a skeletal window hanging sign,” he says.
George finds that neon is preferable if a client is trying to ascertain a certain look, citing recent signage he did for a pizza parlor and a record store. “Both of these places were going for a 1950s nostalgic look, which LED can’t duplicate yet,” he says.
He still has to let his natural-born artistic talents take over sometimes, citing a neon-outline Statue of Liberty and a skateboarder figure he crafted for a New York City-themed café as an example. “People will bring us a design they want rendered in neon,” he says, “and when you look at it, you realize it’s just not going to be possible.
“So you have to rework the design into something that can be bent into glass tubes to make it happen.”
Although George is a masterful, experienced neon tube bender, he acknowledges that LEDs have changed the lighting industry and how he works. He states that LEDs are the way to go if the lighting component is going to be placed unexposed behind a plastic face, citing labor and maintenance problems that can come with neon. “Some things aren’t possible with neon,” he says, “such as very narrow letter strokes and heights, narrow channel and raceway depths, transformer spacings, complicated shapes, etc.”
Currently the shop is using LED modules from SloanLED and MaxBrite.
Out with the Old
Although George is a sign historian (finding that thoughtful sign designs went “downhill” after the 1960s), he isn’t nostalgic when it comes to production methods.
George considers signage an “art,” but to him, the end-result matters instead of the how-he-got-there. “It’s about what you come up with when you’re done,” he says.
Peer inside his 4,500-square foot shop and, in addition to the neon production plant and traditional tools and machines to fabricate channel letters (Ruoff notcher, Roper Whitney #99 channel letter brake, etc.), you’ll find a bevy of “cutting”-edge equipment: A ShopBot CNC router (one of his favorite “toys”), a Mimaki JV33-160 printer, a Roland DGA plotter, MIG and TIG welders, and a Safety Speed vertical panel saw (to cut out rugged sign faces from non-shaped panels, as well as old sign faces for the dumpster).
George sings the praises of his CNC router and LEDs in the production process. “On channel letters, we used to cut the backs and faces out by hand, bend the neon, and stick it in there,” he says. “Now the CNC and LEDs speed things up so much. What would used to take a week, now takes only a day or two.”
George has been bending neon tubes for twenty years now. Does he miss it? Not really.
“To stand over an 800-degree fire is not the way to make a ‘light bulb’ anymore,” he says. “It’s time-consuming and labor-intensive.
“It’s the same thing with other technologies. Why would you v-carve a sign when you’ve got a router? Why would you hand-letter a “no parking” sign when you’ve got a vinyl cutter?”

Illuminating Projects
Let’s look at how George and his shop are using LED modules in signage projects:
Materials for LED. George believes that the way sign or channel letters are designed and populated “brings out” the best LED lighting offers. “Not done properly, the sign will turn out dull or have hotspots,” he says.
Picking the right material for the LED light to shine through is crucial. The shop prefers using two light-diffusing translucents here—2447 Milky White plastic and 7328 Black vinyl. “The 2447 White works great as a sign face that will be covered with a translucent print or vinyl,” says George. “It lets more light come through, resulting in a brighter face.”
George is perplexed a bit though as to why the 2447 plastic material isn’t more popular. “Maybe it’s because it looks a little more gray when lit,” he posits. “It’s not a pure white. But when you put translucent vinyl on top, it ‘pops!’”
Right now, they’re doing a brand-new sign cabinet for a Domino’s Pizza location that just changed their logo. “They’ve got blue faces, so we’re using white LEDs on white translucent with blue translucent vinyl on top of that,” explains George. “If it was going to be a red face, we’d use red plastic and red LEDs.”
Retrofits. George says that LED retrofits are pretty easy to sell in the right situations at his shop.
For example, they recently retrofitted a thirty-five-foot-tall, open-face, exposed-neon sign spectacular that had been built in the 1950s for a nearby lodge. More shockingly: It was being powered by thirty 15,000-volt neon transformers.
“The electric bill must’ve been astronomical,” says George, adding that it was buzzing so loud it could be heard from a block away. “It’s easy to sell a retrofit when they’re getting $1,000 repair bills every couple of months.”
Also factor in that Zienowicz Sign serviced the sign every three months. “After we’d replace a neon unit or transformer, we’d shortly find ourselves back out there doing the same thing on another part of the sign,” says George. “It was like trying to keep an antique car running and only making repairs when needed.”
George and his employees removed all the neon from the channels and cleaned out the inside. They then made brand-new plastic faces for the letters and installed the LEDs, adding LED border tubing for the towering sign’s outlines.
The finished LED retrofit now sports only ten power supplies. “We made a new transformer box and put them down at the bottom of the sign and ran the wires up,” explains George. “So if there was a failure, we wouldn’t have to use the bucket truck to fix it.”
When it comes to LED retrofits, George lists the following challenges to consider:
- Choosing the right LED module for the job;
- Populating the sign so there are no hotspots; and
- Wiring the sign to meet UL standards for a rebuilt sign.
Cloud signs. One of the most popular LED-illuminated signs that Zienowicz Sign works on are what he refers to as “cloud” signs.
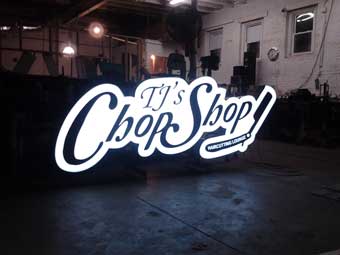
“A cloud sign is not a cut-out individual letter, nor is it a box sign,” explains George. “It’s [a hybrid], and it gives the customer an option in-between the more expensive channel letter and a simple square box.”

For these custom-type signs, Zienowicz Sign uses its CNC router to cut the backs of the letters or the whole sign. The shop then makes the returns out of aluminum and cuts the acrylic or plastic face that matches the back to sit on top of the can. They finish by putting a translucent print or vinyl over the face.
“These types of signs are easy to build for the right-equipped shop,” says George. “You’re going to see a lot more of them in the near future.”
Edge-lighting. George also uses LEDs to edge-light acrylic, plastic, and Plexiglas® materials. When doing so, the biggest challenge is not scratching the substrate surface.
“We’ve found the best way to do an edge-lit sign is to create the image or graphic with paint mask (in reverse), apply it to 1/2-inch clear material, and sandblast-etch the plastic,” says George, explaining that a CNC router “takes longer” here and “doesn’t etch as cleanly.”
George has also installed color-changing capabilities for these signs using RGB modules and a controller. “The controllers don’t cost much and give the customer the option of changing the colors or making it flash,” he says, adding that he’s noticed this lighting solution used for window borders and inside channel letters.
Artistic enhancements. George also finds time to unleash his artistic streak on occasion. (Note: He began his career as a sign painter.)
He has illuminated several pieces for sculptor Christoph Spath. The artist contacted George recently about installing a red glow in the middle of one of his rock sculptures. “[Christoph] had cut that rock in half,” says George.
George’s shop took a one-inch piece of Plexiglas, routed the groove in it, and placed SloanLED flexible border LEDs in it. They then sandwiched this between the two rock pieces.
“This [glowing rock] looked pretty cool at nighttime,” says George.
By Jeff Wooten
All photos: Zienowicz Sign Company


