 Last fall, Mo Flint asked himself, “What can I do to help?” The reason for this question was that the local recreational baseball league association his son has played in for a couple of years was beginning its annual call for volunteers, sponsors, and/or donations. The answer was found in his creative sign-making skills.
Flint is the sole proprietor of his family-run Atomic Barn Studios, an independent theming studio based out of Willow Spring, North Carolina. A few years ago, Flint migrated south from Chicago, taking with him many years’ worth of experience in toy sculpting and transitioning instead to specializing in unique sculptural 3D displays and signage.
He remembered what it was like trying to find “Field Number 3” at the local sports complex when his son first started playing baseball there. There was no on-property directional or identification signage to help parents and visitors find their destination. Flint figured creating a brand-new sign designating Field Number 3 would be a win-win for everyone.
As Flint points out, his Atomic Barn Studios works in more of a niche market. (“There are a lot of shops doing great 2D printed work, and I’m not trying to compete with them,” he says.) His passion is working with 3D signage—and he has been using his two-by-four-foot CNC router, hand sculpting rasps and tools, epoxy, and concrete to come up with standout solutions in this field.
Flint figured a vinyl banner would be too easy to put together and put up on this project. He knew his serious sculpting skills could lead to a “Major League-worthy” custom sign that the park could enjoy for years to come.
At the project’s onset, Flint went out to the local baseball field and surveyed the area and its surroundings, looking to arrive at a design that would fit within the theme of the whole property while not interfering with any games or activities going on in the vicinity.
Flint knew that this new sign should incorporate Americana and “Great American Pastime” iconography. His initial sign sketches involved a dimensional sign oriented in a banner format that could be attached to an existing structure. “I did all kinds of baseball-related designs for the shape of the sign—pennant flags, baseball bats, [all] stars, etc.,” he says. “I knew I wanted to create something fun, since that would reflect playing the sport of baseball.”
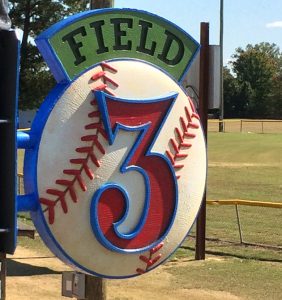
Taking this “fun” approach, he developed and focused on a design that captured all the elements he wanted—a baseball with a clearly visible “3” in its center topped with a grassy green “Field” designation shaped like a baseball diamond. The baseball would feature red, white, and blue colors throughout, and Flint figured it should appear slightly used with some dirt on it. “I wanted to give it a little more character,” Flint says, “like the baseballs that the kids are actually playing with out in the field.”
He created a 3D model of his sign using Geomagic Freeform software for sculpted engineering design and tweaked it until he arrived at a design that would work for fabrication and installation.
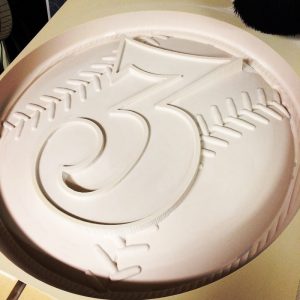
Flint hand-drew the number “3” with a raised board to give it some definition. “Rather than mirror the stitches for the back, they were laid out to line up and flow in the same direction as the front,” he says.
The Field 3 baseball sign is made from three layers of two-inch-thick, thirty-pound-density Precision Board high-density urethane (HDU). Flint leans pretty heavily on thirty-pound Precision Board for a couple of reasons. One is that his shop isn’t very big so he can’t stock a lot of different materials. Another is that it’s heavy-duty and will hold more detail. “If I’m doing hand-sculpting, I will use some lightweight four-pound HDU,” he says, “but when I do, I’ll cover it with epoxy to give it a nice, thick shell.”
The double-sided baseball sign boasts the same design on both sides and features steel tubes sandwiched in between the layers for structural support. Flint rough-cut the pieces on his CNC router using a 1/2-inch ball bit. “I router-cut the number ‘3’ and the baseball on one side and then the other, and then I cut the word ‘field’ on the front and the back,” says Flint. “I then cut out the slots inside the center piece to insert the steel tubes from the outside plate all the way through to the other edge of the ball.”
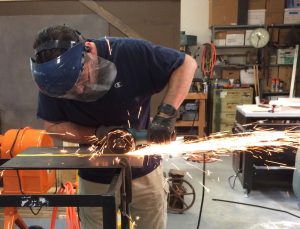
To give the sign ample detail, Flint cut the finish pass with an X-Edge tapered bit with a 1/8-inch ball end (XTC518). He next cut and welded up the steel mounting plate and glued it in place; then he assembled the entire sign using glue and screws. Flint used sculpting epoxy to fill in any remaining visible screw holes.
Flint added a healthy dose of primer to everything on the Precision Board and then applied lots of paint for the discreet colors (white for the baseball, blue for the trim, red for the number, green for the field, etc.). “I like to use a lot of paint,” he says, noting that he used an oil-based primer on the metal pieces to reduce rusting. “So I put a coat on there, let it dry, and then came back and added another coat. Everything on this sign had at least three coats of paint.”
Get into a conversation with Flint and you’ll soon discover that he really loves adding texture to his dimensional signage. This project was no different. He applied two layers of TSF-45 textured surface coating to all the Precision Board surfaces and let it dry overnight. “Texture is just something you can’t achieve with a vinyl print that you can with a 3D sign,” he says.
Flint typically uses a Surform rasp-like tool to create a crosshatch texture for big, open areas. However he finds that it doesn’t get down into corners very well.
To solve this, he has crafted an easily disposable, hand-made tool similar to a mastic trowel that tile professionals use to put down adhesive, which he uses to get in and comb out the TSF-45 in tight spots to give it texture. “I just take a little sheet of plastic and cut square notches on the band saw so you get the kinds or flats on the end,” says Flint. “I can get right up into the edges and the corners, such as right up along the number ‘3.’”
The “real fun” of this project, according to Flint, was applying glaze over the layers of discreet base colors on the baseball sign. “Glaze really adds depth and character to the sign and makes it much more interesting,” he says. “Here I wiped it off immediately after applying it. It gets down into the crevasses and brings out that texture.”
The finished sign measures nearly two-and-a-half feet tall and five-and-a-half inches thick. Flint mounted it directly to the backstop on the field by attaching two metal U-bolts from behind the sign and out through the mounting plate. This solution holds everything in place around the pole.
“I was trying to come up with something that wouldn’t involve a lot of permits and other work for the association,” he says. “Mounting it directly to that backstop was the perfect location for people to see it as they’re coming through the parking lot.” (Note: He added his shop’s name plate at the bottom to match the rest of the sign design.)
Flint doesn’t need analytics to know that his Field 3 sign will be an “all-star player” on the scene for years to come, a fact he attributes to its dimensionality. “Three-dimensional sculptures really capture people’s attention and get noticed,” he says. “Coming from my toy background, I always treat my works as sculptures and try to bring those elements into all my projects.”
In fact, Flint believes the power of 3D signs is that they’re interactive. “There’s a time and place for everything, and there really are some gorgeous 2D signs out there,” he says, “but sculpted signs create a feeling that flat signs just can’t reproduce. Think about Star Wars Galaxy’s Edge at the Disney parks. Their 2D banner signs that just say ‘Star Wars’ might look awesome, but it is their 3D sculptures that encourage people to touch them and help create a mood for the environment.
“Since a baseball field is already very interactive, this dimensional baseball sign really fits in there.”


