In today’s sign industry, vehicle wraps have become ubiquitous and almost a sure source of profit. After all, you cannot drive down the street without seeing at least one wrapped vehicle advertising a business or service. And the growing popularity of color-change wraps has expanded the market even further.
But a poor installation can drive the intentions of even the most well designed wrap off the road. We spoke with Alan Miller, technical service specialist for 3M Commericial Graphics, on what an installer should consider before, during, and after the install.
Before the Installation
Planning is essential, and whether your shop has performed hundreds of wraps or none at all, you should first consider the placement of the graphics.
Since the “canvas” for the vinyl changes with each new car, truck, boat, or other vehicle, it is important to map out just where the graphics will go. Plus unlike the flat surface of a wall graphic or a banner, a vehicle can have many complex curves, deep channels, and even obstacles like rivets that can break up a design.
“Understand that a two-dimensional rendering is not the same as a three-dimensional vehicle,” says Miller. “Therefore planning on where to put text—such as company names, logos, phone numbers, etc.—should be done in the flat areas of the vehicles.”
Before beginning the final placement of the vinyl, an installer should make sure the car is clean. A clean surface is essential to making sure the vinyl adheres properly.
To start, wash the car with soap and water. “This process should be done the day before to allow the water to evaporate around the panel seams. Do not apply a wax or sealer with the car wash as you will have to remove that in the next step,” says Miller.
The next step is to remove anything left behind by the car wash—wax, bugs, and other grime. A solvent-based cleaner can help here.
“The final cleaning step is to use isopropyl alcohol and water (2:1 ratio),” says Miller, “and make sure you clean around and behind all the doors, seams, and moldings.”
In fact, Miller says that one of the biggest errors installers make is not cleaning around, behind, and underneath the various sections of the car.
“There are areas where the film will be tucked or wrapped around,” says Miller, “and those areas need to be thoroughly cleaned. The use of a squeegee wrapped with a lint-free towel can clean underneath a molding or between panel seams.”
During the Installation
Once the car has been thoroughly cleaned, the installation can begin.
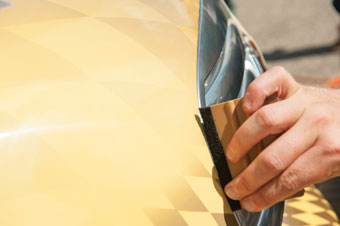
Installing vinyl can involve a lot of stretching and heating, and it is important to know the limitations and recommended temperatures for the different types of films.
“If you are using calendered vinyls, then you need to know the limitations about how much it will stretch and shrink back,” says Miller. “If you are using cast vinyl films, know that there are different films that stretch at different maximum levels.”
Miller also points out that the most common place for errors on an install is in recessed areas where the film needs to be stretched.
“The most common issue is the inefficient post-heating process,” he explains. “After the material has been stretched into the channel, it must get hot enough to prevent it from lifting in the channels. The use of a torch is not good enough [here]; only an industrial heat gun and infrared thermometer is able to tell you if you get the film to the correct temperature.”

When working on a recessed area or a compound curve, the use of a primer can help to minimize lifting or curling of the film.
A final thing to remember is that application fluid is typically not necessary. Many films now feature pressure-activated adhesive properties, which allows the graphic to be moved around to the correct position before the adhesive is activated by pressure.
After the Install
Once the vinyl is on the car, the job still is not finished.
“The installer should go back and post-heat any areas where the film has been stretched,” says Miller. “Also the installer should resqueegee any edges where the film has been trimmed and tucked, to prevent lifting or curling of the film after application.”
To make sure customers get the best results and longest life out of their wrap, installers should educate them on the aftercare of their new graphics before they drive away.
“One of the best ways to maintain the vehicle wrap is to keep the wrap clean,” says Miller. “In some industrial areas, the acid from the dew can cause the overlaminate to turn brown, so rinsing and wiping down the graphics are a good idea.”
3M offers a few more tips customers should know about taking care of their wrap:
- Never scrub the film. Scratching and abrasion marks may be visible, and you may not be able to work them out of the unique finish of the film. For this reason, avoid brush-type car washes.
- Do not apply waxes or polishes to matte or textured films.
- Use a cleaner designed for high-quality painted surfaces. The cleaner must be wet, non-abrasive, without strong solvents, and have a pH value between 3 and 11.
- Rinse thoroughly after cleaning and dry with a clean, soft cloth or soft rubber squeegee to avoid water spots.
- Store indoors or under a cover whenever possible, to avoid fading and degradation from prolonged exposure to sun and atmospheric pollutants.
With the proper preparation and knowledge, you will be on your way to the fast lane of wrap profits in no time.
By Ashley Bray
All photos: 3M


