Owned and operated by the White Earth Ojibwe tribe, the Shooting Star Casino, Hotel, and Event Center (SSC) in Mahnomen, Minnesota is a Midwestern home to Las Vegas-style gaming, entertainment, shopping, and dining. But after fourteen years using the same branding, of the same branding, the tribe wanted a new look here.
Their rebranding was also going to require updating all the exterior signage found throughout the SSC campus. This was divided into two phases. Phase One involved the design, build, and install of a new, sixty-five-foot-tall pylon sign on an existing single-pole structure.
Jackpot! Enter Indigo Signworks, Inc., a state-of-the-art sign design, fabrication, installation, and service company headquartered in Fargo, North Dakota (with other offices in surrounding North Dakota and Minnesota locations).
This full-service shop works on lots of different types of signs—pylons, monuments, awnings, digital displays, neon and LED lighting, channel letters, ADA compliance signs, graphics, etc.—so they were well prepared to handle all the various elements this project encompassed.
The SSC signage makeover was divided into two phases. Phase One involved the design, build, and install of a new, sixty-five-foot-tall pylon sign with an electronic message center (EMC) on an existing single-pole structure. Completed by Indigo Signworks this past June, it includes the following components:
* A 15-by-20-foot, double-sided 16mm full-color display;
* Custom LED pucks populated into the Shooting Star “badge” logo at the top of the sign;
* Combined halo- and face-lit channel letters;
* Glass bead epoxy texturing throughout the entire sign body;
* Complementary stone accents for the sign cladding drawn from the Casino’s exterior architecture;
* SloanLED Colorline blue LED lighting bordering the pole cladding and uppermost top section;
* Four narrow-focus SkyTracker spotlights manufactured by Ballantine and Strong that create a “triangular beam” of light that can be seen for miles around; and
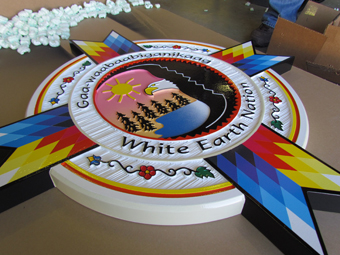
* Precision carved/routed HDU tribal logo work and plaque at the base of the sign.
{2j_imageviewer 77}
Beginning and Bidding
For the past decade, Dan Combs, project manager at Indigo Signworks, had established a nice working relationship with SSC and assisted them with site signage on many occasions (including an LED EMC pylon sign and illuminated canopy for the SSC’s StarMart C-Store).
When the signage makeover project came up, Combs and Eric Sterling, designer for the project, met with casino officials to discuss concepts for all this would entail. They learned that, even though the casino wanted to replace the outdated pylon sign that was then up and running, for cost reasons, they still wanted to keep its existing foundation.
“But did they want to go glitzy or go conservative?” says Combs. “So we showed examples of our other signs and asked them for their opinion,” says Combs. “[Their responses] helped us narrow down the designs.”
Before this meeting, both Combs and Sterling visited the SSC campus, evaluating the site, taking photos of their signs, and paying close attention to the colors and the architecture. “There’s a lot of field stone and cultured stone being used on the exterior of their gaming facility, casino, hotel, and event center,” says Combs, “and we thought the new signage should reflect this.”
After a few sketches and re-sketches, the final sign design was agreed upon.
Everything started with the main pylon identification sign layout. In fact, the remaining building and secondary signage for phase two was designed off this new main ID sign: a single-face channel letters-and-cabinet sign system for the main entrance, an LED-accented pylon sign along the highway, rear entrance halo-lit and face-lit letters, and a new awning makeover at the front of the casino that will use aluminum instead of canvas for a more rigid, metal-looking product.
Once the sign concepts were selected, the project was sent to numerous other sign companies for bidding. “The casino required this, in order to ensure competitive pricing,” says Combs.
A few weeks later, Indigo Signworks was awarded the project due to their understanding of the scope of work, their relationship to the client, their proximity to the site, and their unique manufacturing and installation capabilities.
“The installation of the Shooting Star Casino signage for our new StarMart C-Store was flawless and more than we ever expected,” says William “Bill” Marsh, general manager of the Shooting Star Casino, Hotel, and Event Center. “So of course, when the time came to update our main exterior ID sign, Indigo Signworks was at the top of our list, due to their professional staff, exceptional service, and top-quality sign production and installation.”
Design
Indigo Signworks Graphic Designer Greg Nelson started the process by using Gerber Omega 5.0 software to create the vector shapes for router files, vinyl cutting files, etc. He also employed a variety of software for various purposes:
* Finalize the conceptual designs (Omega 5.0 and Adobe® Illustrator®);
* Give fabricators scaled drawings of each section of the sign for them to scale from (Omega 5.0);
* Provide other vendors associated with this project detailed drawings showing the framework and where their product fits on to it (Illustrator/PDF);
* Produce a spec manual for the client to keep detailing materials, dimensions, power supply locations, etc. (Illustrator); and
* Illustrate night views of the signage for the client (Adobe® Photoshop®).
Nelson worked closely with the fabrication department. “The initial working sketch files artwork was exported from Omega 5.0 into EnRoute 7.1, our CNC editing/routing program,” says Fabrication Manager Dave Barker. “In doing so, the signage was then sliced and diced into sections for the various departments to properly fabricate and later assemble.”
{2j_imageviewer 78}
Main ID Sign Body
The skeletal steel framework for this uppermost section of the sign was created first. (Note: Steel framework also hosts the stone and metal cladding and serves as the backdrop of the SSC digital badge.) Indigo Signworks started with a frame for the face portion and built half of it, just past the pocket. They built another frame to match it off one-foot metal sawhorses.
Meanwhile, due to the height of the sign and the power supplies and wiring to be placed inside, after the frame was built and supported in the center, a sixty-foot ladder system allowing people to climb the pole was also built and installed inside the Winnebago body, the EMC frame, and the pole cladding. “While we always recommend a crane/basket truck, this system was necessary for sign assembly on site and any future servicing,” says Combs.
Indigo built the main 11-by-31-1/2-foot sign body—dubbed the “Winnebago”—in two sections. This allowed production to flip, rotate, or relocate the components during the production process. ““If assembled in one piece, it would’ve weighed too much to do this,” says Combs, “nor would it have been able to fit into our paint spray booth.”
Lead Fabricator Tim Welter explains, “After each ‘half’ was built, we fit it together and drilled the holes into it so that it would eventually bolt together.”
Skinning the “Winnebago” involved many pallets of aluminum sheeting to cover the inner steel structure. This required exact fitting, drilling, and riveting.
Once the sheeting was completed, all of the mounting points for the large Shooting Star channel letters were plotted on a pattern using Signlab 7.1 and then pre-drilled prior to painting to assure proper and accurate placement. “This would ensure a non-compromised painted surface during letter installation,” says Welter. “We filled the holes drilled into the sign with studs and standoffs that support the lettering.”
Video Screens
Shooting Star Casino’s goal was to upgrade the sign’s antiquated video screen to give them video and graphic capabilities now and in the years to come.
Indigo Signworks paired up with Daktronics, Inc., and offered SSC officials a number of different options in both size of display and clarity. Shooting Star Casino chose a full-color 16mm display that has the capability of showing video, graphics, text, and animations.
Electronic display carriers were fabricated to help mount the 15-by-20-foot screens to their frames. “We built these in sections,” says Combs. “We assembled them later on-site, to ensure an easy installation process in the field.
Daktronics LED puck elements are at the top of the sign and complement the video screen below. They are completely programmable on their own or can share “screen space” with the larger video display below.
{2j_imageviewer 79}
Indigo’s production department used a MultiCam CNC router to precision-route the custom faces to accept the LED puck system for the logo. “These pucks and their power supplies required a precision touch to ensure the mapping of the future graphics is correct and unaltered,” says Combs.
Daktronics visited the Indigo Signworks facility and ran test and color patterns on the screens and LED pucks to ensure everything was working properly and sequenced correctly.
As part of the agreed-upon contract, custom digital content is generated by Creative Services, a department of Daktronics. “This includes their logo and animation,” says Combs. “So if you take their shooting star badge or text, Creative Services will build animated content from that artwork.”
Channel Letters
Digital Fabricator Alissa Stotts generated the channel letter files using EnRoute 7.1 to have them routed out of .063 aluminum (returns) and .177 acrylic (faces) using 0.25-inch single flute cuts on the MultiCam CNC and Onsrud bits from ABC Sign Products.
They created the five-inch-deep returns for the letters using an Accu-bend CNC letter-forming machine, while an Accu-Clinch assembled the metal components. Meanwhile they produced the edging the acrylic faces using a CLN Quick Trim Notcher. The silver Jewelite trim cap is one inch.
Indigo Signworks generated the LED lighting population and power supply files for the letters using Aries LED Wizard 7.1 and then installed SloanLED lighting modules. For the letters that are both face-lit and back-lit, the company installed a clear divider inside them that allows the lighting to escape through both faces of the channel.
Stand-offs were attached to the backs of the letters and test printing was performed for the gradient letter application.
The Indigo Signworks graphics department printed and laminated 3M translucent film overlay 3630-20 White onto the faces of the channel letter set and logo and encased them in Jewelite.
Power Supplies
The power supply bank for the LED letters and video display was mounted onto aluminum sheet and then placed in the main ID sign on both halves of its upright braces. This was done so no one inside would hit them. “There are a lot of things going on inside here, such as the power boxes for the searchlights above,” says Welter.
With the amount of power supplies inside, precision router-cut vents were added to allow the sign to breathe. “Proper airflow from top to bottom of the sign is critical in keeping the LED power supplies, the electronic message center, the LED puck systems, and the SkyTracker Promotional lights cool and dry in all seasons,” says Combs.
{2j_imageviewer 80}
Cladding and Epoxy Finish
Due to the size of the system, the cladding for the pole cover below the Daktronics 16mm EMC was fabricated in three separate sections—assembled “faces first” and then split apart to incorporate the edges of the sign. The frames were built back to back, and once they were completed, they were split apart and the steel struts that create the “depth” of the cages added.
“The aluminum skin of the cladding sections started as ‘mill finished’ but left the spray booth with a primer coat to protect the steel from rusting,” says Combs.
Indigo Signworks turned to Signs By Benchmark of Watertown, South Dakota for the faux-stone brick structure of the sign, which they built out of expanded polystyrene. This stone work was completed and installed on the numerous sections of sign components that contain this element (such as the pole cladding and top of the sign structure). “After the stone was completed and the product was ready to skin and texture, they were given their final coat of coloring to match the rendering,” says Combs.
Painter Kris Rud used glass bed epoxy finish throughout. The first coat consisted of PPG epoxy primer, the second coat was PPG glass-filled epoxy texture coat, and the third coat was a PPG single-stage polyurethane paint.
 Tribal Logo
The SSC wanted the required tribal logo to be visible, low to the ground, durable, and prominently displayed to any foot traffic passing the structure.
The logo was made from expanded polystyrene foam, which allowed fabricators to sandblast the design into the substrate better than wood. With the different masks and filters, they were able to achieve a “wood grain” appearance in some of the design’s elements. It was then hand-painted using automotive-grade PPG paint, while the gradient-fade was airbrushed.
(Note: Indigo sub-contracted the tribal logo element of the project out to WoodMaster Graphics of Lynwood, Illinois, due to past experiences with them.)
The element was installed to the base of the sign as it neared completion with aluminum threaded studs and nuts on the inside of the cladding. The studs were patterned onto a piece of paper, which was then transferred to the base of the sign. Holes were drilled to accept the studs.
This portion of the sign was bolted into place firmly to detour any vandals.
Installation
{2j_imageviewer 81}
Indigo partnered with Wanzek Construction of Fargo, North Dakota for the mid-June installation.
The pieces were placed onto a low-body, flatbed semi-trailer for shipment to the casino site for installation. “Before shipping the ‘Winnebago’ to the casino site, we assembled the two units together in our lot,” says Combs. This allowed for this large section to be lifted onto the truck bed and set in once piece.”
However before installation could begin, the older sign structure had to be removed. This went as planned, thanks to pre-planning site visits. Due to the massive size of the components and the weight of the pieces, it was important Indigo had the proper trailers, trucks, and oversized road permits to transport the pieces away. As the pieces were removed, they were sent off-site to be recycled.
The new sign components were assembled piece by piece on the existing pole and foundation. This began with the bottom three pole cladding pieces and continued upward into the large digital sign screen, followed by the “Shooting Star” channel letter cabinets, and finally ended with the stone top that houses the LED dynamic puck system. This took approximately one week to complete. “During the installation process, the crews were focused on the inside of the sign’s internal support, welding, and reinforcements,” says Combs.
The primary crane used for this sign was a 120-ton LinkBelt Hydro crane, not only because of its lifting capacity but also its reach. “With the sign being over sixty-five feet tall and some of the components being over fifteen feet tall, we needed a ‘lift height’ of over one hundred feet to clear the pole top, as the components slid into place,” explains Combs.
Meanwhile installers used ninety-seven-foot and eighty-seven-foot Manitex cranes to position crewmembers in the air around the components while they were being installed. Individual crew were positioned in the baskets at the end of the cranes and helped guide components in place and weld, secure, and fasten them together.
{2j_imageviewer 82}
The LED screens were delivered to site as four individual components. These components were removed from the flat bed, disassembled from the shipping frames, and reassembled to the carrier that would house them over the single pole structure.
It was critical to ensure that each screen was assembled together on the double-sided steel carrier so that no seams were visible once the signs were installed. After a little bit of adjustment to each unit, the double-sided screen component was then lifted in place by Wanzek using the 120-ton crane over the single pole structure and secured to the sign body and foundation.
Finally SkyTracker manufacturers visited the site the following week to assist in aiming and narrowing their beams on top of the structure after electricity had been connected to the fixtures. “These power supplies were mounted inside the sign prior to it leaving our manufacturing facility, and the fixtures were installed at the end of the project, once all components were in place,” says Combs.
Extras
Faced with production questions during the initial stages of the conversation regarding how long the project would take and what materials would be used, Combs and Indigo Signworks Marketing Coordinator Angela Dahl offered something their shop had never done before. They provided the casino access to a special Web site that was updated weekly regarding the production and installation status of the signage.
{2j_imageviewer 83}
Dahl took production snapshots in the shop every day and uploaded all of them to the site at the end of each week, with explanations of what was being worked on.
“With a project of this size and magnitude, we wanted [SSC] to know exactly what went into manufacturing and building a sign like this,” says Combs. “It was also a fun, behind-the-scenes way to the introduce them to the people in our organization who were building it—letting them know that this employee was handling the channel letters, this team was handling the metal fabrication, this group was handling the video displays, etc.,” says Combs. “They also got excited as they saw the signage near completion.”
Conclusion
With Phase One officially finished, work has now turned to manufacturing the Phase Two signage. Everything is well within budget, and excitement hasn’t diminished any whatsoever.
“The pride that all our firm has that we were chosen for this job and that the customer is happy with our results has been a bright feather in our cap,” says Combs.
To view a short video of the entire project, visit http://bit.ly/1yGrWsN.
—Jeff Wooten


