Although flexible magnet sheeting can be quickly and easily employed by sign makers such as yourself in plenty of different end-user applications—vehicle graphics, point-of-purchase campaigns, display decoration, etc.—your knowledge of this medium shouldn’t be limited to just cut-vinyl.
Either through lack of education or communication, some sign professionals still might not be fully aware of how to use magnet material or even how to work with it.
So let’s help change that, shall we?
Welcome to our “Flexible Magnets 101” course! Several manufacturers will be your professors and instructors this month, in an effort to help graduate you to a better understanding of this “attractive” medium.
Open Class Question True or False: You can print directly onto magnetized material.
If you answered “true” here, then you may very well already be starting on the path to our class valedictorian.
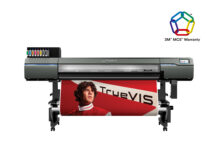
In fact, almost any type of printer—digital, flexo, offset, wide format inkjet, etc.—is capable of printing directly to the flexible magnet sheets that are out there today.
“The only decision to make is whether to use pre-magnetized media or un-magnetized media,” says John De Leon, director of Sales and Marketing at Arnold Magnetic Technologies. “If your printer does not have metal parts—or if you can cover up any of these parts with cardstock (so the magnetic material does not stick to them as it passes through)—then you can print directly to pre-magnetized media.
“But if the metal parts are difficult to cover, you can print onto un-magnetized media just like paper, cut out the shapes, and then magnetize it with a hand-held or motorized magnetizer before providing it to your customers.”
Although you can easily print onto magnets, you still must utilize caution. For instance, if you’re running such a sheet through a hot printing press, be aware that the vinyl could move around on the magnet.
Meanwhile if the magnet will not feed over the metal parts of your printer, you may need to create an air gap mask.
Pop Quiz: How do you create an Air Gap Mask?

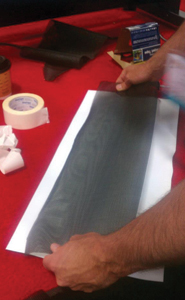
Nicole Sheridan, marketing manager at manufacturer Magnum Magnetics, provides the following four essential steps for creating an air gap:
Step 1: “Cut a piece of the magnetized magnetic media to fit the shape of the metal parts on your printer.”
Step 2: “Apply double-sided tape to the non-magnetized side of your shaped magnet.”
Step 3: “Remove the backing to expose the adhesive.”
Step 4: “Lay a thick piece of material over the tape. This can be a thick mesh screen purchased at a local home improvement store,
canvas, vinyl, chipboard, poster board, card stock, etc. Ensure that the layer is thick enough to interfere with any magnetic pull. If the printable magnetic media still sticks, repeat this step until the material feeds smoothly.”
While Sheridan points out that there is not one official “correct” way to create an air gap, these four mentioned steps should prove ideal. “We encourage our customers to get creative to incorporate this into their current process,” she says. “My suggestion is to ensure the magnet will feed smoothly over the material used to create the air gap and that the material will not jam or create head strikes as it is feeding.”
Lesson: Overlaminates
Many sign shops will still print onto a layer of vinyl and then laminate that layer onto the magnetic sheet. However these extra layers can delaminate over time, causing the magnet to fail.
Then the print provider will take the magnet that’s already covered in vinyl and output it onto a film or overlaminate with adhesive backing and apply this to the magnet. They’ll then put a clear film over the entire project. The multiple layers laminated to the magnet can prevent the magnet from laying flat. This will result in a curl or a wavy edge, which leads to delamination of the layers.
So if direct printing is easy, why would a sign maker take this chance by laminating?
“The only reason for overlamination is to protect the ink that they have printed the product with or to give the product a different cosmetic appearance, such as a glossy or matte finish,” says Steve McLevey, product manager at Arnold Magnetic Technologies.
Melissa Thompson, sales manager of Flexible Magnetic Products at Master Magnetics adds that a clear laminate is absolutely necessary for outdoor applications when printing onto the magnet with dye- or pigment-based inks, since the printing surface required on the surface of the magnet is paper. “However on the pigment ink-printed magnet, the overlaminate will only protect the top surface and not the edges,” she warns.
Lamination failure can usually be noticed at the corners or in an isolated area where outside debris has chipped the laminate. “Even the smallest chip can allow air between the laminate and the magnet, resulting in a failure of the finished product,” states Sheridan.
Cram Session: Troubleshooting Tips
Delamination is but one troubleshooting factor to keep on the lookout for. Sheridan points out the following additional problems and solutions:
• Tension Issues. This happens when you use too much tension when applying the overlaminate to the magnetic sheet. This will pull the magnet (creating a “curling” effect). Your end-result will be delamination.
Solution: Use the lowest tension settings to allow the product to lay flat. “Test a small piece first with the overlaminate process and the least tension setting,” says Sheridan. “Let the magnet relax to ensure that it lays flat.”
• Heat Issues. Be careful that you’re not using too much heat. And if you have to apply hot glue to the back of a laminate, this can cause the vinyl to shrink—thereby cracking the magnet and damaging the laminate.
Solution: “Instead of hot glue, use a pressure-sensitive overlaminate (like a peel-and-stick),” remarks Sheridan.
• Adhesion Issues. The overlaminate being used isn’t consistently sticking to the mounting substrate.
Solution: “Use consistent pressure when you apply the overlaminate to avoid inconsistent stick,” says Sheridan. “If the overlaminate doesn’t stick consistently over the printed parts of the mounting substrate, you need to pay attention to the ink coatings. The ink flood coat can cause the overlaminate to stick differently than the unprinted surface.”
• Magnetic Memory Issues. When approaching the end of the roll, you may find that the magnet will not lay flat for printing. This is because the magnet is rolled on a three-inch core, which means the magnet will curl due to “memory.” Also you can find bubbles in the middle of the roll when approaching the end.
Solution: “The magnet will need to lay flat for a little while to relax before printing,” suggests Sheridan.

Final Exam: Storing Flexible Magnet Sheeting
Most magnetic media is safe to store for one year, but keeping this material in your shop (whether in flat sheets or rolls) requires a low humidity and a constantly cool storage area.
“What also helps in storing magnetic material is to buy material with a clear protective coating on the back side of it to prevent it from adhering to other magnetic material while being stored, otherwise known as ‘blocking,’” says De Leon. “This clear coating will also prevent the promotional magnet from sticking to its mounting surface, as long as normal cleaning procedures are followed.”
Once you’ve finished printing onto the magnet, lay the product flat until you’re sure the ink is completely dry. “Then if you’re going to roll the magnets after print, always roll onto a cardboard core with the printed side facing out,” states Thompson, noting that this will prevent the curling effect from taking place on the applied surface.
(Note: And be sure to store the finished magnet in a container, so the exposed graphics won’t get damaged.)
Remember earlier when we said to store magnets in a constantly cool area? Well you have to make sure the room is not too cool. Thompson advises that it’s important to not roll magnetic material in temperatures below 60°F. “Cold temperatures can cause magnets to stiffen,” she says.
It’s also important to read the “Clean and Care” instructions included with the magnet product and remove it frequently for cleaning and inspection. “Always use a mild detergent soap to clean the magnet,” advises Sheridan.
Extra Credit: Reusing Magnets
After the client is finished with their magnetic sign, can you recycle this sheet or is it straight to the landfill?
The final answer really depends on how the original vinyl graphics were applied to the magnet. “Ultimately the more layers of vinyl you add to the magnet, the more your chances increase of the overlaminated vinyl layers producing product failure,” says Sheridan. “The magnet will remain magnetized, but the finished surface may fail.”
However magnetic material by itself can be recycled and reused to make more magnetic material in its plain state. “But once an adhesive or film, such as polypropylene or paper, is added to it, it’s no longer a good candidate for recycling,” adds De Leon.


