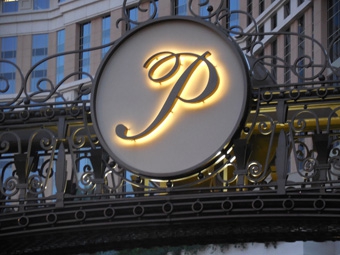
Halo glow” channel letters, or “reverse-lit,” have long been an elegant way to provide illuminated signage for that special client.
However the incorporation of LED lighting into these letter types has created a new need for designers to understand and reevaluate the relationship between several factors here—the letter shape, the letter size, the letter depth, and (most especially) the quantity of light exiting out the back.
The surface that a set of halo glow channel letters is attached to also plays a key factor in achieving uniform illumination. This necessitates adding some more factors to the discussion: What type of surface are the letters being attached to? What does the surface look like? What is the distance between the letter and the mounting surface?
Have you ever walked through a mall looking at its illuminated interior signage and thought that you’ve spotted a real service opportunity? Or have you noticed how the letters in an airport concourse don’t shine as brightly as they do elsewhere?
There is no real criticism intended here, but there are some newer halo-glow letter styles that look just as good when their lighting is actually turned off.
A portion of this situation can be attributed to the interior ambient lighting. To compensate, the illuminated sign needs some additional lighting to help it, compared to those letter sets installed under the darkness of the nighttime sky.
This brings up one of those learning curve items that LED sign lighting has brought anew to the sign industry. How much light is enough light? Or how well do reverse LED channel letters illuminate in such lighting conditions?
Unlike neon (a continuous light with illumination that radiates 360 degrees along the tube as the glass snakes uninterrupted through the letter shape), LED lighting starts as a point source light.
So to make this LEDs work in halo-lit applications, you’re going to need to look at direction, diffusion, and distance.
Direction
In halo glow applications, you’ll need to point the LEDs inward so that the light exits out the back and is reflected a greater distance from the source to surface.
Rule of Thumb #1 is to have plenty of light to start with. Compare ribbon LED lighting on the inside of a letter return versus a wired string of modules stuck to the inner backside of the face, as an example.
Multi-row ribbons of LEDs also give the lighting a punch compared to a single-installed strip. Ribbon lighting may not be the trick for exterior letters, but the close continuous spacing of these LEDs will help smooth the illumination. You still won’t end up with a continuous light as you would with neon, but you’ll achieve lighting that’s closer together.
Some ribbon lighting systems have the LEDs aimed 90 degrees to the backing tape. The intent is to direct the illumination parallel to the surface (i.e., the letter return). Point these same LEDs inward with the interior painted white (a plus when the letter does not feature a lot of depth).
Without the need for glass tube supports, neon tubes, and electrode housings, thin letters are much easier with LED lighting. You don’t lose light when the direction is a reflection.
Diffusion
One traditional halo glow option that will assist in diffusing LED lighting is a white polycarbonate backer. This also doubles as a simple method of attachment.
Look at this as a channel letter in reverse. If you understand the depth required to make a face-illuminated LED letter look good—with smooth uniformity—simply flip it around. This style may require a letter with a thicker stroke, where the mounts and the LED modules could be centrally located and the reflected light exits backwards along the perimeter.
Alternately the design could be illuminated with what we affectionately call “LED triple-headers.” This type of sign lighting product takes several LEDs together as a unified group (arrayed modules) with the resultant output a wide spread up to 180 degrees. (Note: This isn’t a bad result, but keep in mind that the neon you are replacing and/or replicating is 360 degrees.)
Lens LEDs with optics are another new sign industry solution. A lens over the diode takes the emitted light and alters the original beam, spreading and diffusing the point source. This is built-in LED light control.
In some cases, the optics are created to pitch the light a longer distance (as would be installed in a long, narrow sign cabinet). In other designs, the lens serves to spread the light into as wide a pattern as possible.
In fact, lens technology from several suppliers has created LED sign lighting modules that work quite well in letters as thin as three inches.
Distance
Distance may be the method of creating uniformity in the LED lighting as light spill moves out letter to letter and hopefully around the mounting method. Further away, the glow spreads until it reaches a point of diminishing returns.
In general, the further away from the background the sign is mounted, the wider and smoother the band of light.
To experiment with distance, start with a sample letter flat on your workbench. Set it on top of a material that is comparable to the intended mounting location.
How does it look just sitting there? If there is a thin line of light around the perimeter of the letterform, pull it away, increasing the distance from the surface.
This distance check also works for testing the quantity of light.
Use a symmetrical letter, like a Helvetica Bold “H.” Install different brands of LED modules on the back of each side and compare; maybe even use different quantities to compare. Some experimentation is a necessary component in the LED mounting process, simply based on the variety of products available.
The correct distance for LED illumination with halo glow letters is still quite a variable. You may consider closer to be beneficial, creating a defined glow that utilizes the letter shape to advantage.
Keep in mind that the mounts for reverse-lit letters need to be thought out differently. Stand-off supports that simply hold the letter away from the wall may interfere with the uniformity of the illumination exiting the back of the letter and onto the wall behind.
An acrylic letter back with threaded stud mounts that are centrally located is a solution to many halo glow lighting issues. This type of fabrication and illumination has worked well in the past with neon.
Depending on the style of LED used, a removable letter with an affixed back should give the installer an easier time with the installation. Service would also be easier, even if marketing thinks of LED lighting as extremely long lived.
LED halo glow letters with a full open back and perimeter L-bracket stand-off mounts can create unwanted dark spots (for both neon and LED) though. Clear letter stand-off mounting systems are available that are interesting attempts to eliminate spurious shadows while still providing an easy-to-mount shape.
Then there is the soon-to-be-released Magic-brand Invisible Sign Supports that make one wonder what is actually holding letters off the surface. In fact, you may have to slide a hand in back to fully understand the trick. You know something is there, but you’re just not sure what.
Hopefully my ideas here have helped you to put your thinking in reverse when it comes to proficient channel letter illumination.
By Peter Perszyk


