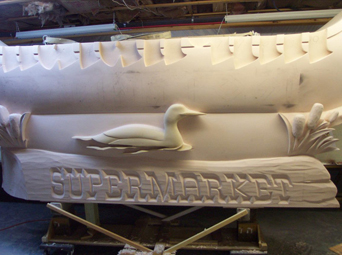
The Indian Hill Trading Post is a general store located near Moosehead Lake in the small town of Greenville, Maine. The current father-and-son owners decided it was time to replace their long-standing, yet very plain, double-pole-supported sign. However they not only
wanted a new sign that captured the spirit of the surrounding wildlife and outdoor activities, they also desired something artistic.
The owners contacted Tom Stade, well aware of the artistry he personally gives all his sign creations.
Stade is the second-generation owner of Moosehead Signs, also in Greenville, and he comes by his artistic talents naturally. Before starting this business, his father, Harold B. Stade, had attended the New York Trade School for Fine Lettering and Showcard Artistry after serving in the 82nd Airborne during World War II. (Note: In fact, Stade’s father continued hand lettering until he was ninety.)
Today Tom is the sole employee (except when his brother Spike helps out part-time). In 1978, he started a business called AllSigns, Inc., in Westwood, New Jersey. However Tom moved back to Maine in ’97 and works entirely on hand-made commercial signs.
Stade began by drawing up five designs on his computer for the new Indian Hill Trading Post sign. The owners picked the version featuring a canoe, logs, a duck, a bird, freshwater, and reeds, as well as “Indian Hill” and “Trading Post” letters in different font styles. “I find myself designing things and then later saying, “Now how am I going to build this?” laughs Stade.
Because his shop space has low ceiling height in the daylight basement of the building he owns, Stade determined that he was going to have to build this sign as two separate pieces. The top half would feature the canoe and nature scenery and the bottom half would be the logs.
Stade crafted everything out of multiple sizes and thicknesses of Precision Board™ high-density urethane, which he’s been using for a long time now.
However he first had to build the supporting aluminum framework that would also serve as the sleeve for mounting to the existing posts.

When gluing this piece together, Stade placed a piece of plywood inside it, in order to distribute the added weight evenly while the adhesive dried.
Stade also cut 6.25-inch OSB spacers and placed them between the framework, in order to maintain proper spacing support for the custom-cut 5-foot-by-10-foot-by-4.5-inch-thick Precision Board side panel. “I wanted to have that true flat face, so those spacers in hold the aluminum framework the right distance apart,” he explains. “This way, they wouldn’t sag.”
Stade then inserted a vertical piece of aluminum, which would be later used when sliding the piece over the poles on-site.
In order to move the two un-carved block sections of Precision Board around his shop and allow for carving on all sides, Stade took three four-wheeled wooden furniture dollies and connected them together using 3/4-inch plywood along with a wider piece of plywood in the middle for added stability. “This way, they wouldn’t tip over,” he explains.
Stade mounted and braced six-by-six post pieces onto the dolly base, keeping the exact-same distance as the spacing of the poles on-site.
These custom-made dollies also enabled Stade to move the two sign pieces outside and onto his transport trailer for temporary attachment. This method allowed him to make the necessary transitional carving. “I had to make sure that they were carved accurately at the bottom of the top piece and the top of the bottom piece, to make sure they’d fit tight. I also had to carve the transition of the log where they met,” he says, noting that he would then take the pieces down and move them back inside his shop for further work.
Most of the sign was hand-carved by Stade. One notable exception was the “Indian Hill” lettering, which was CNC-routed with an extra-bit of hand carving).
In order to figure out the depth of the letters, Stade laid out all the letters in his design software program and viewed the sign at side-profile. This helped him realize what kind of relief he needed on the canoe for letter placement.
Stade created a template for mounting the Indian Hill letters on his CNC router out of 1/4-inch Luan plywood material and nailed it to the Precision Board using four thin-wire, rosin-coated nails. “I then hand-routed that ‘cookie-cut’ relief into the HDU block so that my letters would line up, because I knew when everything was done, it wasn’t going to be flat and square,” he says. “I just pulled [this template] off when I was done.”
When routing out the original template, Stade had to allow for the offset of the router template guide; this way, when hand-routing later, he would have the same exact size as the outer dimension of the letter. “If I didn’t cut out the mounting reveal first, it would’ve been a heck of a job trying to line up those letters,” he explains. “Doing so allowed me to go ahead and carve into the curved canoe and then my letters would mount right where I wanted them.”

Stade credits his father’s work for coming up with the birch bark “Trading Post” letters. “My dad used to hand-letter them all the time to give them a realistic look,” he says, noting that he designed the font and routed out their basic shape from 1.5-inch Precision Board using a CNC router. He then whittled each one with a knife to get the look he wanted.
For the logs, Stade created a pounce pattern off his plotter for the different lettering fonts of these remaining lines. (Note: The Barnum used for “Supermarket” was his own design.) He used a ruler to line up the top and bottom of the lettering’s placement and then hand-drew “supermarket,” “liquor,” “clothing,” “footwear,” and more with a pencil over the pounce for clarity. Stade then hand-carved the words into the Precision Board.
Stade brought back his CNC router to carve the “G-I-F-T-S” lettering and scrolls for this contour button piece. He then epoxied it onto the Precision Board before carving the log textures.
Speaking of “log textures,” it proved challenging for Stade to figure out its “right” bark look. He tested carving techniques on several samples of Precision Board, until he reached the texture he wanted. He used wire and abrasive brush wheels, along with chisels, to achieve this effect.
In addition to hand chisels, Stade actually worked with an electric chainsaw to rough out the details of the sign, such as the watery wake trailing the loon. The use of special grinding wheels also proved invaluable.
Stade also employed a 1-1/2-inch-wide plastic scrape with a bit of a curve to it (similar to a hunter’s bow) that one would find in an auto body shop. “It’s a very handy tool,” he explains, “especially when I had to scribe the contour of the canoe onto the back of the birch letters in order for it to fit nice and snug.”
Stade’s brother, Spike, artfully carved the chickadee bird out of Precision Board. “I drilled holes into the canoe and epoxied the birds’ legs (aluminum) right into the canoe,” explains Tom.
With the exception of lettering enamel brush-painted for the decorative scroll work around the top of the canoe, Stade used Behr latex paint and his four-stage HVLP Sherwin-Williams® spray unit to paint a lot of the sign. (Note: The birch letters, bird, and smaller elements were also hand-painted.)
The logs were painted with flat latex and the rest with gloss. Stade finds that latex paint is cost-effective and holds up better than traditional oil-based enamel paints, which start to get chalky over the years. “It also dries quickly, enabling you to keep on painting. With certain enamels, you have to wait awhile before being able to apply a second coat or additional colors, especially if you’re taping and covering,” he says.

Stade would leave little Popsicle sticks underneath the painted carved pieces on the table, so they wouldn’t dry onto the paper underneath them.
For the canoe section, Stade covered the parts not being painted with protective wrapping and moved from the top downward with his painting. Once finished, Stade attached all the letters to the canoe using silicone adhesive and epoxy.
On the day of the install, Stade rolled the two sign pieces out of the shop. A friend of his used the cherry picker on his logging truck to load each of the heavy pieces onto his wood-decked trailer. “Before strapping them in, I nailed two-by-fours down in front and in back of the wheels on each unit, along with diagonal bracing, so they wouldn’t move,” he explains.
The Trading Post owners removed the old sign before Stade showed up for installation, so that was one less item to worry about. The logging truck boom moved the sign pieces so that they slid over the pre-existing posts, while a person on a ladder helped guide the pieces into place.
Stade designed the signs (and aluminum framework) to just drop down over the existing sign poles. “The poles actually sleeve into the aluminum framework I created,” explains Stade. “There was a plate on the very top section that the sign would rest on, along with mounting two one-and-a-half-inch steel angles onto each post at the base of the sign frame.”


