Laminated floor graphics have been used for years for in-store advertising. “Floor graphics have grown to a $2 billion market because they are effective in stimulating impulse sales,” says Chris Charles of Think Patented, a print provider in Miamisburg, Ohio. “The trick though is getting shoppers into the stores.”
According to Charles, that is the value of street/sidewalk graphics. “[They] help drive traffic through the front door by enticing shoppers with money-saving specials or the latest and greatest new products,” he says.
Now Avery Dennison® Graphics has introduced its MPI 6121 Street Graphics Film, a floor graphics solution for short-term outdoor applications (such as retail promotions) to unfinished concrete or asphalt. Applied correctly, the Avery Street Graphics film will typically withstand normal foot traffic for up to 120 days.
Combined with window displays, colorful, outdoor street or sidewalk graphics can help entice window shoppers to check out a promotion, which, in turn, builds store traffic. This type of material can also deliver a powerful marketing message when applied outside of convention centers, sports arenas, or entertainment halls.
When specifying a material, a major consideration for Think Patented is ease of use. “Stores in a chain can be located across the country,” says Charles. “If we had to schedule installations, that could be a logistical nightmare.
“That’s why we select materials easy enough for a store employee to apply. It reduces installation costs for our customer and simplifies program implementation.”
The new Avery MPI 6121 Street Graphics film is intended for production of large format graphics using a UV-curable inkjet printer.
“If you want to achieve maximum advertising impact, the bigger the graphics the better,” says Paul Roba, strategic sales technical manager for Avery Dennison Graphics. “Big graphics with bold colors attract attention, which makes it more likely that your message will be read.”
Preparing the Surface
The key in achieving good adhesion is an application surface that is clean and dry. If the surface is wet, the film will not stick.
Before beginning the application, make sure that you inspect the crevices and cracks of the concrete or asphalt for any moisture.
To clean the surface, you will need a push broom. Brushing the surface from different directions will sufficiently remove any dirt and loose debris.
For this application, Avery Dennison recommends using RTape ApliTape™ 4000 low-tack application tape.
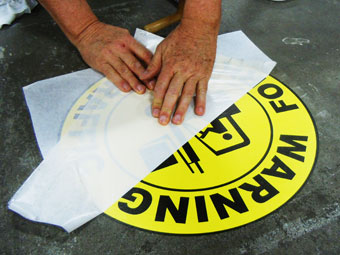
Unroll the tape so that the adhesive side of the tape is facing up. Then position the printed graphic facedown onto the application tape.
Squeegee the release liner side (backside) of the graphic. Using firm squeegee pressure, begin with a squeegee stroke down the middle of the graphic.

Working from the middle stroke, squeegee the backside of the graphic to one side. (Note: Make sure to always overlap your squeegee strokes here.)
After squeegeeing one side, return to the center and apply pressure to the other side of the graphic. During the process, slightly angle the squeegee to direct the air away from the center of the graphic. (Note: Using this technique to apply application tape will prevent wrinkles in the tape and entrapment of air bubbles between the tape and the graphic.)
After you have squeegeed the backside of the graphic, flip it over and squeegee the application tape side. Remember that application tape is a pressure-sensitive material, so use some pressure in the application process.
To facilitate the application of the graphic, after positioning the graphic where you want to adhere it, apply a tape hinge along the top of the pre-masked graphic. For this application, I used an aggressive plastic tape to ensure that the graphic didn’t come unhinged.
Cut through the tape hinge along the edge of the graphic.
Flip the graphic up and peel back about eight to ten inches of the release liner, exposing the adhesive. With your thumb, crease the liner. (Note: Folded under the graphic, the liner will help hold the exposed adhesive away from the application surface.)
Using one hand, hold the bottom of the graphic at a low angle away from the application surface.
Beginning at the top of the graphic, squeegee the film using good pressure and overlapping strokes. (Note: For this type of pressure, I recommend using a stiff nylon squeegee.) As you apply the film, gradually remove the release liner.
After you have squeegeed the graphic securely in place, use a three-inch rivet brush along with a little heat to burnish the street graphics film into the texture of the concrete or asphalt. In the burnishing process, the film will fracture and conform to the rough surface. (Note: Do not overdo it with the heat, or the film will bubble off of the surface.)
After you have squeegeed and burnished the graphic with the rivet brush, wait about five minutes before removing the application tape from the film. Carefully roll the application tape off the applied graphic by peeling it back at a 180-degree angle over itself.
After the tape has been removed, resqueegee the entire graphic. Heating the edges of the graphic with an industrial heat gun or propane torch with help secure the film and prevent edge curl.
Vinyl Removal
As easy as Street Graphics material is to apply, it is just as easy to remove.
“At the end of the promotion, all you need is a pressure washer to blast it off of the pavement,” says Roba. “The graphics remove cleanly without using any toxic chemical removers.
“After the surface is completely dry, it’s ready for a new marketing message to be applied.”
By Jim Hingst
Photos: Think Patented


