 Jim Hingst
We all are taught that we shouldn’t assume. However I have to confess that I was guilty of this faux pas during a recent workshop I conducted on vinyl applications. I demonstrated application to just about every other surface—rivets, corrugations, textures, etc. I just assumed that everybody already knew how to install graphics to flat surfaces.
Shame on me! I found out later that some of the attending newbies felt I had skipped some of the critical basics concerning flat surfaces. Mea culpa. They were right!
In the “Hingst’s Sign Post” column featured in the October 2011 issue of Sign Builder Illustrated magazine, I made some amends by covering step-by-step instructions on how to apply vinyl to flat surfaces—in particular, windows. Here on the site, I wanted to provide additional details about applying vinyl to other popular flat surfaces such as expanded PVC, walls, and acrylic.
Note: To read about applying vinyl graphics to vehicles, be sure to check out my column in the November ‘11 issue of Sign Builder Illustrated.
 Expanded PVC
I don’t know of any surface that’s easier to apply vinyl to than expanded PVC. It’s an extremely forgiving surface to work with. My only concern with this substrate is making sure that what you stick on it stays stuck. Here’s why:
An integral component of PVC foam board is a release agent that can hamper adhesion. The surface must first be wiped down with acetic acid (white distilled vinegar) and then quick wiped with toluene.
Remember: Inhalation of toluene and other solvents can be hazardous to your health. So be sure to follow the manufacturer’s recommendations, such as working in a well-ventilated area and using chemical gloves.
For applications to substrates such as expanded PVC or when the graphics are small- or medium-sized, there’s no need to use application fluid or tape hinges to aid the application. Installation is simply a matter of positioning the graphic in the correct location, peeling off the release liner from the graphic, and squeegeeing the vinyl in place.
After laminating the application paper, tape the graphic in the desired position using two pieces of masking tape.
Then draw registration marks from the application paper onto the application surface (substrate). Many installers will draw two “x”s as registration marks. Along the edge of the graphic, draw a straight line on the substrate and through the “x.”
There’s a right way and a wrong way to transfer plotter-cut graphics from the release liner. The right way is to turn the graphic over so the application tape is facing your work surface and away from you. Peel the liner from the back of the graphics, rather than trying to pick the graphics off of the liner.
If the graphics release with difficulty from the release liner, rub the back of the liner against a sharp edge of your work bench. Then, using firm pressure, resqueegee the application paper with a hard nylon squeegee and remove the release liner as described in the previous step.
Align the registration marks on the paper application tape with the corresponding marks on the substrate.
Beginning in the center of the panel, squeegee the graphics with vertical stroke using good squeegee pressure. This first stroke should serve as your centerline, with all subsequent strokes following this point. Each stroke must overlap the previous one. The squeegee should be angled slightly away from the centerline.
If you need to reposition the graphic, snap the material off of the substrate with a quick jerking motion, similar to setting a hook in fishing. Pulling the graphic slowly from the surface will stretch the material out of shape.
Remove the application tape from the graphic by pulling the tape at a 180° angle against itself.
Note: Stubborn application tape can be more easily removed with application fluid. Lightly spray the tape with application fluid, wait about thirty seconds, and remove it. The fluid penetrates the paper and softens the tape’s adhesive, causing the adhesive to release from the graphic.
After removing the application tape, inspect the graphic for bubbles.
To puncture a bubble, always use a pin. After pricking the bubble on an edge, use your thumb to force out the air. The pinhole will close around itself. (Note: Never slash a bubble with a knife. Cuts will open up over time.)
The final step in any application is to always resqueegee the entire graphic. By resqueegeeing the graphic you’ll ensure that the vinyl is securely in place.
Caution: Hard plastic squeegees can easily scratch soft vinyl films. To prevent scratching, slip a low-friction sleeve over your squeegee. Another option is to cover the graphic with the release liner from either the application tape or the graphic, with the siliconized surface against the vinyl. Squeegee the backside of the liner starting from the center and working outward.
 Wall Graphics
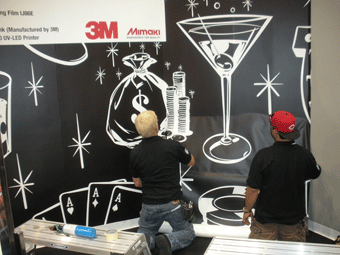
Applying vinyl graphics to a flat, painted interior wall should be a snap. These surfaces, however, are not without their problems.
Some problems are related to the type of paint used. Flat finish latex paints can be a real problem, because the flattening agents used in the paints can inhibit adhesion. In some cases, you may need to recommend repainting with a gloss or semi-gloss paint.
If the walls have been newly painted, make sure the paint it thoroughly cured before applying the vinyl graphics. As a rule of thumb, allow the paint to cure for a week before applying any pressure sensitive films. High humidity or cold temperatures can slow this curing process down, in which case you’ll need to allow for additional curing time.
The next step is to clean the painted surface before applying the vinyl graphics. If the walls are newly painted or relatively clean, prepping the walls is usually nothing more than wiping the surface with a clean, damp lint-free rag.
If an older wall surface is contaminated with years of grease, dirt, and smoke film, the wall must be cleaned before either painting or application of pressure-sensitive materials. Any areas of the wall that are damaged must be repaired before graphics installation. Don’t expect wall graphics to adhere to peeling or chipped paint, dented wall surfaces, or holes in the wall. Failure to make necessary repairs often results in vinyl graphics failure.
Painted drywall surface is contaminated with grease or dirt, so the wall must be washed. To ensure that the paint bites into an older painted wall surface, old-time painters would wash the wall with trisodium phosphate (TSP). Available at hardware stores, this heavy-duty cleaner will cut through the years of grease and scum that accumulate on a wall and etch the surface.
For cleaning walls, mix and apply TSP according to the manufacturer’s instructions. Although the TSP cleaners vary, typically about 1/4-cup of TSP is mixed into a gallon of very warm water.
Using a sponge, apply the cleaner to the wall surface. Drench the sponge in clean water, wringing it out until it is just damp. Wipe the dirt and grime from the wall surface.
With a wet sponge wipe the surface immediately after cleaning. Failure to properly rinse the residue from the wall will contaminate the surface, which can cause vinyl adhesion problems.
Laying out the job. The first step in any graphics application is to layout the job. After unpacking and unrolling the graphics, match the panels and make sure that you have all of the parts that you need.
Before you get started, you may also want to tape the graphics in place to make sure that everything fits. If they don’t, don’t panic (especially in front of a customer). Just do some creative on-site readjustment to make the graphics work.
To ensure that you keep your panels level, you can stretch a level line that you can align the top of the graphic sheets to. Applying graphics over a chalk line isn’t recommended, because the chalk dust can contaminate the adhesive causing adhesive failure. An alternative is, using a pencil, lightly mark a horizontal line and a vertical line on the wall to aid alignment as you apply the graphics. A four-foot level helps greatly in ensuring that your vertical line is plumb.
When applying vinyl graphics to painted drywall, always install the graphics dry. Don’t perform a wet application to a drywall surface.
Applications are easy enough if you use the following procedure:
A. Remove about eight inches of the release liner from the top of the graphic and fold it back on itself.
B. Crease the liner so the graphic lays flat as you align the exposed top edge of your panel to your horizontal alignment marks.
C. Check to see that the panel also lines up with your vertical marks. If you get your first panel applied perfectly, subsequent panels are easy to line up. (Note: Avoid repositioning the graphic as you work; this can pull off any unsecure paint.)
D. When applying wall graphics, start your stroke at the top of the graphic in the center of the marking. Then squeegee horizontally from side to side. Always be sure to use overlapping strokes.
After removing the application paper, resqueegee the entire marking—especially the edges—to ensure good adhesion.
Acrylic Sign Faces
Several years ago I was giving a talk to a large group of Italian sign makers. At the beginning of the workshop, I told them never do a wet application.
As I finished my presentation, one person stood up. “I know that you told us not to do wet applications,” he said, “but now could you show us how to do one?”
Of course, I complied.
There is, after all, one exception to the “only do it dry rule”. While I still believe that you should only do a wet application as a last resort, acrylic sign faces are the exception.
Surface preparation. After removing the surface protection masking from the sheet of acrylic, it’s time to prep its surface. Do not use window cleaners or strong solvent to clean the sheet.
Cleaning the surface with a dry rag is also verboten. Dry rags potentially could scratch the plastic as well as generate a static charge.
Regardless of how you decorate acrylic, you must clean any contamination off of the surface. Failure to properly prep the sheet prior to processing often results in graphics failure (including poor paint or ink adhesion, inconsistent coatings, and peeling vinyl films).
While we all know that you can make an “ass” of “u” and “me” when you assume, we should always assume that every substrate has some surface contamination and requires cleaning. In the graphics field, this is the universal exception to the “never assume” rule.
In prepping acrylic prior to decoration, follow the manufacturer’s instructions explicitly. Some cleaners are appropriate for cleaning acrylic, but many are not.
For example, don’t clean acrylic with solvents such a toluene, xylene, or lacquer thinner (which can craze the sheet).
Be very careful in using any solvent stronger than alcohol for cleaning. Strong solvents will subject plastic sheet to stresses that often result in crazing and eventually cracking.
If the surface has grease or tar, try naphtha or kerosene to remove it. If you have to use one of these stronger solvents, be sure that the sheet is completely dry before painting.
Wet application procedure. In those rare cases when I recommend the use of application fluid, either use a commercial-grade application fluid (such as Rapid Tac) or use the following recipe:
Mix a half of a teaspoon of “Joy” dishwashing liquid and a half of a teaspoon of isopropyl alcohol in 20 ounces of clean water. (Note: Never use Windex as an application fluid. The silicones and surfactants in this cleaner will contaminate the adhesive and cause adhesion failure.)
When using application fluids, less is usually more. Lightly mist the substrate with application fluid, using the least amount necessary to accomplish the job.
Don’t spray the adhesive side of the vinyl graphics and application tape. This often causes the graphics to prematurely release from the tape, resulting in installation mishaps.
Use a hard, nylon squeegee with firm pressure and overlapping strokes. Start in the center and working outward to force out the fluid from underneath the graphics. Using firm squeegee pressure is critical when you’re applying a pressure-sensitive film. It’s called “pressure-sensitive” for a reason, so apply some pressure.
Wait a few minutes after installing the graphic before removing the application tape.
To facilitate the removal of a paper application tape, spray the tape’s backside with application fluid. The fluid will penetrate the paper and soften the adhesive, allowing the tape to release more quickly.
Using too much application fluid—and failing to remove the application tape promptly—can cause the adhesive to delaminate from the tape. Cleaning this residual adhesive can be annoying and time-consuming.
After removing the application tape, mop up the residue with a paper towel.
After removing the application tape, use a squeegee covered with a low-friction sleeve and squeegee the entire graphic again. The low-friction sleeve prevents the squeegee from scratching the bare vinyl. This step prevents edge lifting and ensures good adhesion.
Conclusion
Any application is easier and more trouble-free is you follow a few basic rules:
* Choose a vinyl film with a more forgiving, repositionable adhesive. Applications are performed in less time, and you’ll experience fewer mishaps. And because damage to graphics will be reduced, so will costly rework.
When temperatures are high, films with aggressive adhesives become sticker. These adhesives are more prone to preadhesion or pretack. And once the graphic sticks, you are usually stuck.
* Use the highest quality tools possible. Professional-grade tools won’t make you a professional decal applicator, but you can’t do a professional job without them.
* Practice. We all know the maxim that perfect practice makes perfect. This rule especially applies to vinyl application.
By attending workshops and watching videos you can learn the right way to install vinyl over rivets. Then it’s up to you to hone your newly learned skills with practice.
Photos (top to bottom) courtesy of: Dave Forrest, Pacon, Merchant Circle.


